Configuring coding agents with Modelflare: Claude Code, Codex, OpenCode, Gemini CLI, CC-Switch, and Grok Build
Claude Code connects through Anthropic Messages at https://modelflare.dev, Codex, OpenCode, and Grok Build through https://modelflare.dev/v1, and Gemini CLI through GOOGLE_GEMINI_BASE_URL. All of them use the same Modelflare key.
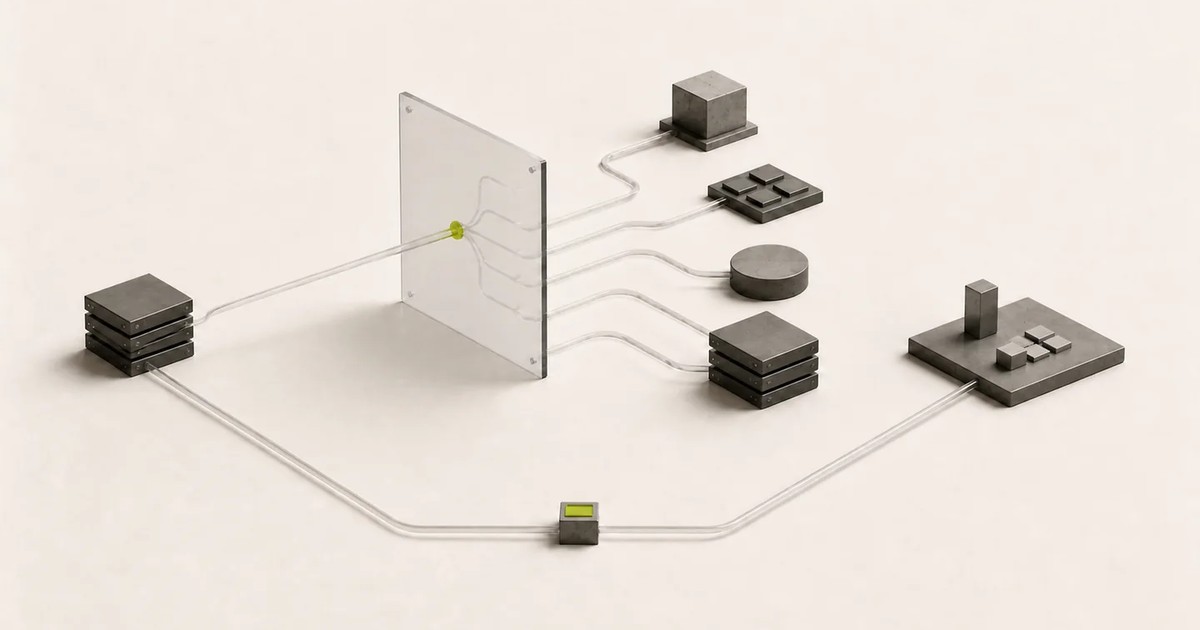
Coding agents expect different wire protocols. Claude Code uses Anthropic Messages, Codex and Grok Build use the OpenAI Responses API, OpenCode uses an OpenAI-compatible provider, and Gemini CLI uses the native Gemini API. Modelflare serves all of them behind one key. This guide gives the configuration for each client, taken from the Modelflare documentation.
Note the base URL difference. ANTHROPIC_BASE_URL is https://modelflare.dev without /v1, because Claude Code appends the Messages path itself. OpenAI-style clients use https://modelflare.dev/v1.
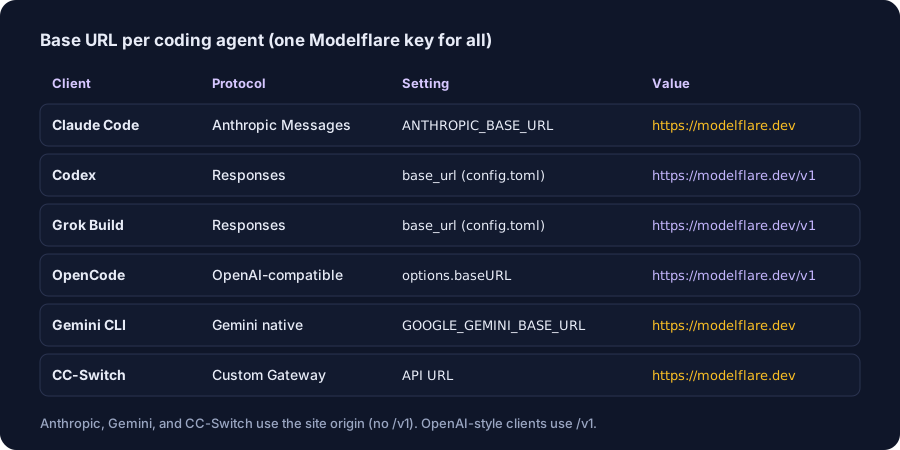 Base URL per client. Anthropic, Gemini, and CC-Switch use the site origin; OpenAI-style clients use /v1.
API key
In the console, create an API key in a non-default group that can access the model the agent will use. The guides below use claude-opus-4-8 and claude-sonnet-5 for Claude Code, gpt-5.6-sol for Codex and OpenCode, and grok-4.5 for Grok Build. A Smart API Key is an alternative: it resolves a routing group on each request across every model the account can use, so no group needs to be chosen.
Claude Code
The installer installs the official CLI when needed, asks for the key once, backs up and merges existing user settings, and verifies both configured models. On Windows PowerShell, run irm https://modelflare.dev/install/claude.ps1 | iex instead.
curl -fsSL https://modelflare.dev/install/claude.sh | sh
For a manual setup, write the following to ~/.claude/settings.json:
{
  "env": {
    "ANTHROPIC_BASE_URL": "https://modelflare.dev",
    "ANTHROPIC_AUTH_TOKEN": "YOUR_MODELFLARE_API_KEY",
    "ANTHROPIC_MODEL": "claude-opus-4-8",
    "ANTHROPIC_DEFAULT_OPUS_MODEL": "claude-opus-4-8",
    "ANTHROPIC_DEFAULT_SONNET_MODEL": "claude-sonnet-5",
    "ANTHROPIC_DEFAULT_HAIKU_MODEL": "claude-sonnet-5"
  }
}
Restrict the file with chmod 600 ~/.claude/settings.json, start claude in a trusted project directory, and send "Reply with one sentence confirming the active model." A normal reply confirms the setup.
Codex
The installer is curl -fsSL https://modelflare.dev/install/codex.sh | sh. For a manual setup, create ~/.codex/config.toml:
cli_auth_credentials_store = "file"
model_provider = "modelflare"
model = "gpt-5.6-sol"
model_reasoning_effort = "xhigh"
disable_response_storage = true
model_supports_reasoning_summaries = true

[model_providers.modelflare]
name = "Modelflare"
base_url = "https://modelflare.dev/v1"
wire_api = "responses"
requires_openai_auth = true
and ~/.codex/auth.json:
{
  "auth_mode": "apikey",
  "OPENAI_API_KEY": "YOUR_MODELFLARE_API_KEY"
}
Keep both files private (chmod 600 config.toml auth.json on macOS and Linux). Do not add a provider auth command block; current Codex releases require requires_openai_auth = true for this API-key path.
Run codex --model gpt-5.6-sol and send "Reply with one sentence confirming the active model and provider." If a ChatGPT login screen appears, quit every Codex session and reopen the CLI. A model_not_found error means the key's group cannot serve gpt-5.6-sol.
OpenCode
Add opencode.json to the project directory:
{
  "$schema": "https://opencode.ai/config.json",
  "model": "modelflare/gpt-5.6-sol",
  "provider": {
    "modelflare": {
      "npm": "@ai-sdk/openai-compatible",
      "name": "Modelflare",
      "options": { "baseURL": "https://modelflare.dev/v1" },
      "models": {
        "gpt-5.6-sol": { "name": "GPT 5.6 Sol" }
      }
    }
  }
}
Start opencode, enter /connect, choose Other, set the provider id to modelflare, and paste the key. Select the model with /models.
Gemini CLI
npm install -g @google/gemini-cli@latest
gemini --version
Set the key and base URL (Linux or macOS; on Windows PowerShell use $env:GEMINI_API_KEY and $env:GOOGLE_GEMINI_BASE_URL):
export GEMINI_API_KEY="YOUR_MODELFLARE_API_KEY"
export GOOGLE_GEMINI_BASE_URL="https://modelflare.dev"
Then start the CLI with a model ID from the Modelflare catalog:
gemini --model YOUR_MODEL_ID
If the CLI prompts for an authentication method, choose Use Gemini API key.
CC-Switch
CC-Switch stores Codex, OpenAI-compatible, and Claude Code profiles and switches between them without manual file edits. On the Modelflare API Keys page, open a key's action menu, select Import to CC Switch, choose Claude Code or Codex, and confirm the primary model. Then enable the imported provider in CC-Switch; the import does not switch the active provider automatically. To add the provider manually, create a Universal Provider with the Custom Gateway preset and set the API URL to https://modelflare.dev. The import link contains the API key, so use it only on a trusted device.
Grok Build
Grok Build uses the Responses API. Its guide uses a key that can access grok-4.5, the key in the MODELFLARE_API_KEY environment variable, and this ~/.grok/config.toml:
[models]
default = "modelflare-grok"

[model.modelflare-grok]
model = "grok-4.5"
base_url = "https://modelflare.dev/v1"
name = "Modelflare Grok 4.5"
env_key = "MODELFLARE_API_KEY"
api_backend = "responses"
Test the connection with grok -p "Reply only: Modelflare connected" -m modelflare-grok.
Other tools that accept an OpenAI-compatible base URL can be pointed at https://modelflare.dev/v1.
Image and video generation from an agent
The Modelflare Media Skill is an installable SKILL.md package for Claude Code, Codex, and other agents that read skills. With it, an agent can select an image or video model, quote the price, submit the request, wait for video tasks, and save the result. To install it, send the agent: "Install this skill: https://modelflare.dev/skills/modelflare-media/modelflare-media.zip (or use the attached zip), then read its SKILL.md. If you do not support skills, extract it anywhere and follow SKILL.md. My key is in the environment variable MODELFLARE_API_KEY." The skill reads the live catalog and each model's documentation page at call time and requires Node.js 18 or newer. See the Media Skill guide.
References
The Modelflare/coding-agents Space collects these setups. Related Spaces are Modelflare/openai-sdk, Modelflare/api-recipes, and Modelflare/start. Full client guides: Claude Code, Codex, Gemini CLI. For team or enterprise arrangements, contact business@modelflare.dev.